How to Use ShopBack with Book Depository

How to Use ShopBack with Book Depository

How to Use ShopBack with Book Depository

If you came to this part without reading the ShopBack Cheat Sheet, please take time to read so you get the idea of how I earn cashback from buying books from Book Depository.

Sharing is caring!

If you know what you are into, then let’s proceed. Just make sure that you already have your ShopBack account at this point.

If you don’t have a ShopBack account, click this link to create your account.

Book Depository is an online bookseller that offers free shipping including to the Philippines. That’s the reason why I usually buy books from this online platform.

Now, if you haven’t created your Book Depository account, click here to create one.

Once you have both accounts for ShopBack and Book Depository. It’s time to visit the book you want to buy. Make sure you have installed the ShopBack extension tool in your Google Browser or ShopBack Mobile app in your mobile phone.

How to buy books in Book Depository using ShopBack Website

1. Login to your account or click this link to open Book Depository from your ShopBack Portal.

Note: If you see the “Login/Signup” button at the upper right of the portal it means you are not yet logged in. If you see an amount in the upper right it means you are already logged in.

2. Click the “Shop Now” button after the Book Depository header

Note: If you are not yet logged in, you will need to login first using the account you created and if you are already logged in, when you clicked the “Shop Now” button, a prompt will appear.

3. Click the “ Go to Book Depository now!” button to open Book Depository website

4. A redirection page will open and the ShopBack icon on your Bookmarks bar will turn to green. It simply means that the tool is active and tracking your purchases.

5. In the Book Depository page, check if you are already logged in.

Note: If you see the “Sign in/Join” button in the upper right of the website, click that button to log in. If you see “Sign out”, you are already logged in.

6. Once you are logged in, enter the name of the book in the Search box and click Search.

7. Click the book from the list and it will open the details of the book.

8. Click the “Add to basket” and if you want to add more, click “Continue Shopping” but if you are ready to checkout, click “Basket/Checkout”.

9. Click the “Checkout” button, enter your transaction and payment details then click “Buy now” to purchase the item.

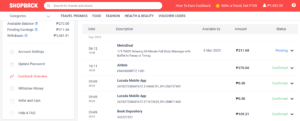
How to buy books in Book Depository using ShopBack Mobile App

1. Open your ShopBack Mobile App and in the Search box, type “Book Depository”.

2. It will show “1 Store found” and select that item.

3. A prompt will show “You are now on Book Depository’s website”, just click “Got it”.

4. Click the hamburger icon in the upper left of the page and select “Account & Help”

5. Click “Sign in/Join” and enter your account details to sign-in.

6. After successful login, enter the name of the book in the Search box and click the Search icon.

7. Click the book from the list and it will open the details of the book.

8. Click the “Add to basket” and if you want to add more, click “Continue Shopping” but if you are ready to checkout, click “Basket/Checkout”.

9. Click the “Checkout” button, enter your transaction and payment details then click “Buy now” to purchase the item.

How to buy books in Book Depository from the Digital Library

Digital Library is a private space in this blog where I personally share the books that I have read. Either you already came in from this space or you haven’t visited it yet, you can click this link to check out the books that I recommend.

1. In the Digital Library, select which book that might interest you and click that book to purchase.

2. In the Book Depository page, check if you are already logged in.

Note: If you see the “Sign in/Join” button in the upper right of the website, click that button to log in. If you see “Sign out”, you are already logged in.

3. Activate the ShopBack Cashback Buddy

Note: If the icon is not in green, it means the ShopBack Cashback buddy is inactive, click it and click “Activate Cashback” when logged in or “Log in to activate” when not logged in. The icon should turn green.

4. Click the “Add to basket” and if you want to add more, click “Continue Shopping” but if you are ready to checkout, click “Basket/Checkout”.

5. Click the “Checkout” button, enter your transaction and payment details then click “Buy now” to purchase the item.
How to Use ShopBack with Book Depository

ShopBack Cheat Sheet: Earn Cashback with Online Shopping

ShopBack Cheat Sheet: Earn Cashback with Online Shopping

There have been hundreds of reviews out there but if you are still new with this app and want to get more insights, then I will tell everything I know. I will also tell you some of the things that they usually don’t mention, that’s why this will be a cheat sheet for you to be smarter on how you use this app.

Sharing is caring!

Before we get into details with this smart app, let’s discuss what ShopBack is.

This is one of the common questions once you know about ShopBack. “What is ShopBack?” or “What is a ShopBack app?”. And I know, there have been hundreds of reviews out there but if you are still new with this app and want to get more insights, then I will tell everything I know. I will also tell you some of the things that they usually don’t mention, that’s why this will be a cheat sheet for you to be smarter on how you use this app.

Here’s the video that I created to answer the Top 10 Questions about this app.

ShopBack Ultimate Cheat Sheet

What is a ShopBack App?

It’s a platform that gets track of your activity with accredited merchants and gives you a commission when you purchased. That is how shopback works.

ShopBack Cheat Sheet

This is one of the largest & fastest-growing online loyalty platforms in Asia-Pacific, with reach across Singapore, Malaysia, Philippines, Indonesia, Thailand, Taiwan, Australia and Vietnam. So it’s not just in the Philippines, it is being widely used across Asia-Pacific.

Now, you might be thinking of who owns ShopBack?

The answer is, Henry Chan and Joel Leong both from Singapore are the founders of this smart app. They created this because they’re idea is to give online cashbacks.

Why Use ShopBack?

Well, definitely because you can earn cash. You can withdraw that earnings into real cash. 

ShopBack Cheat Sheet

Let’s make an example so you have a better understanding of why use ShopBack.

You went to your favorite store to buy groceries, you pay for your groceries with the exact amount. Yes! Exact amount means you don’t have any change. Well, that’s fine. It’s your groceries and you are responsible for what you buy. After paying, you went straight home with your groceries of course. It’s like nothing happens, it’s the usual thing you do. Buy stocks and store it.

After 3 days, someone knocks on your door and gives you a piece of check. That check came from a loyalty club where you signed up a week ago. Well, they detected that you visit one of the shops that are accredited to them and told you that you will be receiving a percentage of the amount you spend to that store.

Well, how would you feel that you earn cash while spending? It’s not a discount nor a promo, it’s simply giving you something in return every time you buy from that store. 

It’s also somehow a marketing strategy, because you will not choose any other shops that are not accredited to that loyalty program. Well, somehow the accredited merchants are well curated and most commonly used.

So if you are not yet using ShopBack, it’s time to create your own account.

If you are still not sure if it will benefit you, here’s all the current merchants they have. You can check if you are using any of the accredited merchants.

How to Use ShopBack?


1. Create ShopBack Account


First, you need to create your own account. You can use my link as a referral to receive a bonus. I will not automatically receive a bonus unless you become active with ShopBack. It means, you have to sign-up, buy something using your ShopBack account with a certain minimum amount and withdraw your first cashback reward, and with that I can only receive my referral bonus. But your bonus, you can automatically have it on your account


 ShopBack Cheat Sheet


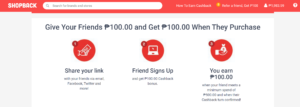
Well, it’s actually a good strategy. Of course, they don’t just want to have a massive sign-up and give them all a referral bonus. If you are a fan of these types of referral schemes, ShopBack is not one of them. They want their referrals to experience the app and earn their own before they say their gratitude to the person who refers them. Besides, the minimum withdrawal is Php 200.00, so if you have claimed your bonus, you just need another Php 100.00 cashback confirmation in your end to be able to withdraw your balance.
 

On the other hand, if you are just planning to register and just send links so you can earn too, it’s not a good way to use the app. You can refer to my Affiliate Disclaimer why I don’t recommend this kind of usage.


Okay, going back to what we are talking about here.


Once you created your own account, the next step is to install the tools we need.


2. Install and Activate ShopBack Extension or App

If you are using your Desktop or Laptop, install the ShopBack extension tool.

ShopBack Cheat Sheet

What is a ShopBack Extension tool? Glad you ask. It’s a piece of software that you need to install in your Google Chrome browser so that every time you visit a website which is a merchant of ShopBack, the extension prompts you to activate it. It is like, telling you, “Hey, this website is a ShopBack merchant, activate me so I can record your purchase”.

Then, if you are using your Mobile or Tablet, install the ShopBack App to your device.

ShopBack Cheat Sheet

Unlike with the extension tool, you need to visit the ShopBack app first on your device and browse the merchant that you are going to use. In this point, it’s either the ShopBack redirects you to the website or the Mobile app of that merchant. Make sure that the Merchant’s app is also installed in your device.

So once the tools have been activated, these tools track your browsing experience until you make a purchase. ShopBack will then validate your cashback in a period of time.

Again, ShopBack wants to ensure that you are really buying things. You are not just buying to earn money then return the item that you bought. Again, it’s not the way it was designed. You will encounter months of validating your purchase. It means, you didn’t cancel, you didn’t return or didn’t ask for a refund. In this case, you will not be eligible for cashback.

Why will you receive a cashback for something that you didn’t use technically. Yes you purchase it, but you returned it, or it was cancelled, it means it was not in your hands or make use of it. 

It’s again, fair terms for each member of ShopBack. Cashrewards are only given to people who really make a purchase and has used ShopBack with it. Smart move! Right?!


3. Redeem Cashback and Withdraw Money

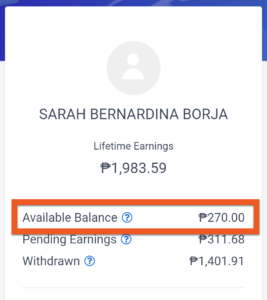
Lastly, once you have enough purchases and you have accumulated confirmed cashback, it’s time to check if you are eligible for payout.

ShopBack Cheat Sheet

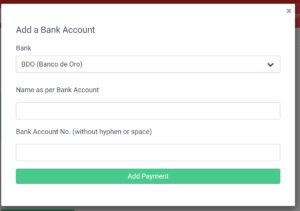
You have to check your withdrawal details. Make sure you add your bank account before you withdraw money from your account. 

ShopBack Cheat Sheet

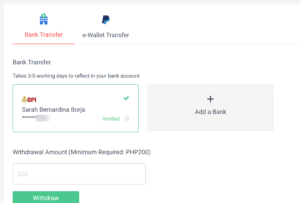
It takes time to verify the bank account but once it’s verified, you no longer need to add it again. You can now withdraw your money anytime you reach the minimum withdrawal amount which is Php 200.00.

ShopBack Cheat Sheet

At this point of time, I have given you everything I know about ShopBack. Hopefully you can use it in a good way like I did and become a smart spender this time.

Now you can see the list in the left side where I will give you the different ways on how to use the app on each Merchant’s that I personally used.

Thank You...

Hope This Helps!
I hope you enjoyed this article and get to know more about ShopBack.

If this helped you in any way, please do me a favor to comment below, and also share this article to the world. Thank you!

Cheers and have a good day!

Step-by-Step: How to Organize your Google Browsers

Step-by-Step: How to Organize your Google Browsers

Step-by-Step: How to Organize your Google Browsers

Learn how to organize Google Browsers with these step-by-step tutorial. I will show you how to add and sync-in profiles, organize bookmarks and setup startup pages.

Sharing is caring!

How many clients do you have? Or how many projects do you have per client? Are you getting confused on your accounts and access? This may be something you need to organize your online work into a better and organized working environment.
 

When I started to work online, there comes a time that I had two clients one at a time. They have different google access, they have different website app need to open at the same time but they need to be open in different browsers.

Two clients plus other personal accounts and access, get me confused. Of course, I want to separate some of my files, links I visited and website apps I open when my browser startup. And most importantly, I want to bookmarks some important links for the client I work on without needing to bookmark them when I recover my desktop. I mean I need to recover them as well when I need to reformat my desktop.

That gives me the idea of organizing my folders, my files and the website apps that I open just using the Google Browser. Of course, they are not developed without a purpose, and I am glad I am able to discover them.

Here are the following items you will also discover upon watching the video, in case you need a detailed step by step, scroll down for the detailed steps.


  1. Adding a New Google Chrome Browser User
  2. Connecting your Google Chrome Browser to your Google Account
  3. Adding New Folder in the Bookmarks Bar
  4. Organizing your Bookmarks Bar
  5. Saving Links to Folder in the Bookmarks Bar
  6. Setting Up Startup Pages

Detailed Steps in Organizing Your Google Browsers

Adding a New Google Chrome Browser User

Advantage of adding a new browser user is you can create separate profiles to split things up. Have an account for work, especially working with multiple clients and having a personal account. Each web browsers can store your personal data, that includes bookmarks, history, settings, extensions, and more in just one profile. You can even use multiple profiles at the same time, being logged into different accounts in each of them.

How To Add a New User in Google Chrome Browsers


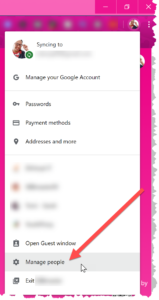
Step 1 : Click the Account avatar on the upper right corner of your Google Browser

How To Add a New User in Google Chrome Browsers

Step 2 : Select “Manage People” in the dropdown list

How To Add a New User in Google Chrome Browsers

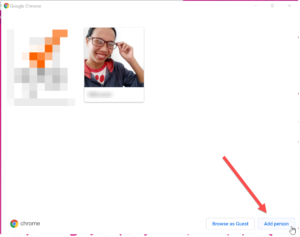
Step 3 : A window will open to show the list of People, click the “Add person” button

How To Add a New User in Google Chrome Browsers

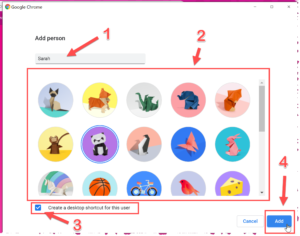
Step 4 : Enter a name for that browser > Select an avatar for that account > Check “Create a desktop shortcut for this user” > Click the “Add” button

How To Add a New User in Google Chrome Browsers

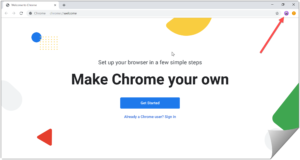
Step 5 : A new Google Browser is created, the Account avatar will show your selected avatar from Step 4

How To Add a New User in Google Chrome Browsers

Connecting your Google Chrome Browser to your Google Account

The advantage of turning on the “Sync” is to save your info and activities in that Google Account. When you sync your Google Account, you will automatically sign-in to all your Google services you visited including YouTube, Gmail and Search. You can also see and update your info across all your devices, and the best reason why sync-in is good, is when you change devices, either you lose your device or get a new device, you will be able to retrieve all your bookmarks, history, passwords and other settings.

ASENSO TIP 101:

Only turn-on Google Chrome “sync-in” with devices you own. If you’re using a public computer or other devices, use guest mode instead. This is to protect your account and access.

How To Connect Google Account in Google Chrome Browser


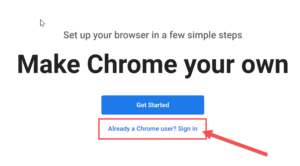
Step 1 : To store your Google Browser’s bookmarks, history, settings, and more, connect it to your Google Mail account by Signing-in using your Gmail

How To Connect Google Account in Google Chrome Browser


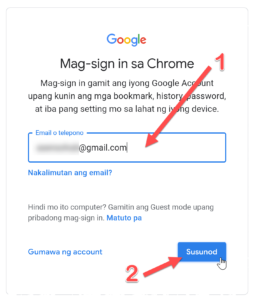
Step 2 : Enter your Gmail account and click Next

How To Connect Google Account in Google Chrome Browser

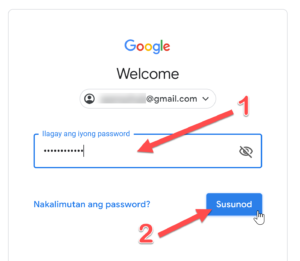
Step 3 : Enter your Gmail’s password and click Next

How To Connect Google Account in Google Chrome Browser

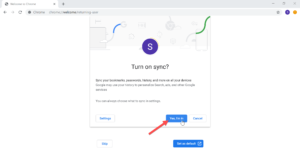
Step 4 : After successful login, click on the “Yes, I’m in” button to sync all your data on all your devices. You can always choose what to sync using Google Browser’s Settings.

How To Connect Google Account in Google Chrome Browser

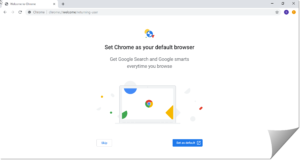
Step 5 : After syncing-in your profile, it’s either you “Set” that Google Browser as your default browser or you can just click “Skip” when not sure.

How To Connect Google Account in Google Chrome Browser

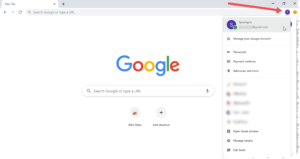
Step 6 : To check your Google Chrome Browser’s account, you can always click the Account avatar on the upper right corner.

How To Connect Google Account in Google Chrome Browser

Step 7 : If you have “Checked” the checkbox in Step 4 (Create a desktop shortcut for this user), you will be able to see the Google Chrome Browser in your desktop.

How To Connect Google Account in Google Chrome Browser

Adding New Folder in the Bookmarks Bar

Bookmarks bar is a great way to save and organize specific website or links so you can revisit them without memorizing it’s web address.

How to add a Folder in the Bookmarks bar using the Bookmarks bar

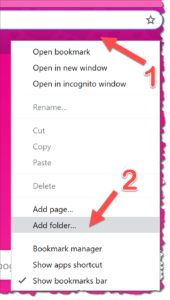
STEP 1 : Right click the Bookmarks bar then select “Add folder” from the dropdown list

How to add a Folder in the Bookmarks bar using the Bookmarks bar

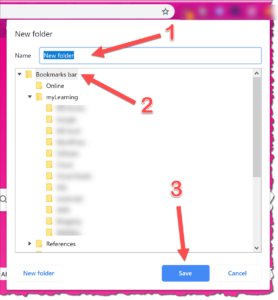
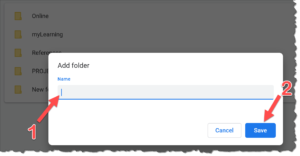
STEP 2 : A window will open for adding a new folder > Enter the name of the folder > Select “Bookmarks bar” from the list of folders > Click “Save” button

How to add a Folder in the Bookmarks bar using the Bookmarks bar

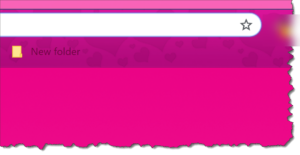
STEP 3 : The new folder will be saved and seen in the Bookmarks bar

How to add a Folder in the Bookmarks bar using the Bookmarks bar

How to add a Folder in a specific folder using the Bookmarks bar


STEP 1 : Right click the Bookmarks bar then select “Add folder” from the dropdown list

How to add a Folder in the Bookmarks bar using the Bookmarks bar

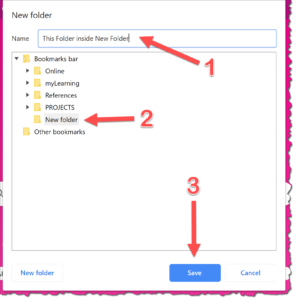
STEP 2 : A window will open for adding a new folder > Enter the name of the folder > Select a specific folder from the list of folders > Click “Save” button

How to add a Folder in the Bookmarks bar using the Bookmarks bar

STEP 3 : The new folder will be saved and seen inside the specified folder

How to add a Folder in the Bookmarks bar using the Bookmarks bar

How to add a Folder in the Bookmarks bar using the Bookmarks manager

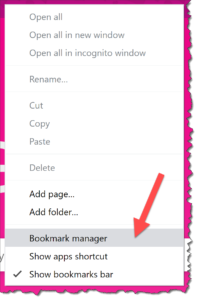
STEP 1 : Right click the Bookmarks bar then select “Bookmarks manager” from the dropdown list

How to add a Folder in the Bookmarks bar using the Bookmarks bar

STEP 2 : The Bookmarks manager page will open (chrome://bookmarks)

How to add a Folder in the Bookmarks bar using the Bookmarks bar

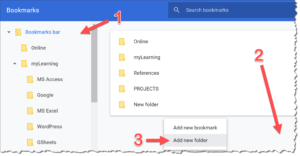
STEP 3 : Select “Bookmarks bar” or a specific folder name from the list of folders in the left panel > Right click the grey space in the right panel (below the existing folder names) > Select “Add new folder”

How to add a Folder in the Bookmarks bar using the Bookmarks bar

STEP 4 : A pop-up will appear > Enter the name of the folder > Click “Save” button

How to add a Folder in the Bookmarks bar using the Bookmarks bar

Organizing your Bookmarks Bar

We can organize our bookmarks and file them in custom folders by just dragging them to move it’s places.

Here is a video on how to move folders inside folders from the Bookmarks bar

Here is a video on how to move folders from bookmarks bar inside a folder within bookmarks bar

Here is a video on how to move folders in the Bookmarks bar or inside a specific folder using the Bookmarks page

Saving Links to Folders in the Bookmarks bar

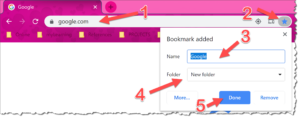
Saving links is bookmarking open tabs to save these links for later use. All you need is to make sure the correct web address is in the address bar, click the star icon, change the name of the Bookmark and select which folder to save then click “Done” button. These links are now bookmarked.

Saving Links to Folders in the Bookmarks bar

Setting Up Startup Pages

Once you have your own profiles for each of your works, you can now open different links once you open that browser. How does it work? If you open your work profile browser, you can setup pages to open your work email or links related to your work. If you open your personal profile browser, you can setup to open pages like your social media accounts or your personal email.

How to Setup Startup Pages


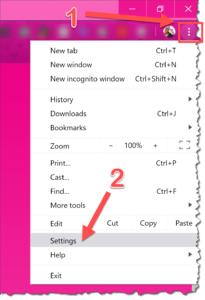
STEP 1 : Click the hamburger icon beside your browser’s avatar and select “Settings” from the dropdown list

How to Setup Startup Pages

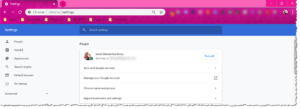
STEP 2 : Chrome’s Settings page will open (chrome://settings)

How to Setup Startup Pages

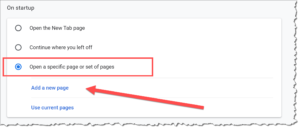
STEP 3 : Scroll down and find “On Startup”, select “Open a specific page or set of pages” and click “Add a new page”

How to Setup Startup Pages

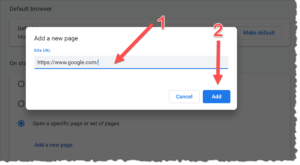
STEP 4 : A popup window will appear, enter the web address in the Site URL field then click “Add” button

How to Setup Startup Pages

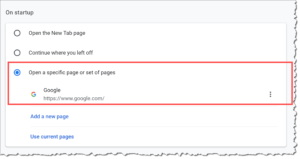
STEP 5 : Once added, the page is added under the “Open a specific page or set of pages”

How to Setup Startup Pages

STEP 6 : Once you opened the browser, the pages listed in STEP 5 will open automatically.

How to Setup Startup Pages

Thank You...

Hope This Helps!

I hope you enjoyed this tutorial. I really created this one because many freelancers has been asking me to teach this in more detailed one.

If this helped you in any way, please do me a favor to comment below, and also share this tutorial to the world. Thank you!

Cheers and have a good day!

Reasons to Subscribe to our Email List:

Reasons to Subscribe to our Email List:


✓ Free Updates   You can get inside without purchasing anything. You get instant access to free resources, tutorials and contents that matters to you.


✓ No Catch   Real content just to keep you updated with my weekly journey - of course my wins but also my failures.


✓ Sneak Peek   We are aspiring entrepreneurs; experimenting and developing is our thing so you get exclusive freeview on what we are working on.

Check your email for confirmation!

Download Asenso Starter Guide E-Book

Download Asenso Starter Guide E-Book


✓ Tips & Step-by-Step Guide: to create your own Domain Name & Hosting Server without breaking your pocket

✓ 100% FREE: You'll receive the file through your email without any fee required 

✓ 1:1 Free Consultation: I will surely help you along the way to get you unstuck

Check your email for confirmation!